Do you update your holiday schedule every year? I just used http://www.calendar-365.com/holidays/2012.html to create my holiday schedule through 2022.
Sunday, June 10, 2012
Tuesday, May 22, 2012
Setting Up Office 365’s Lync for Federation and IM Connectivity
Setting up Office 365’s Lync for Federation and IM Connectivity
is a multi-step process.
Step 1: Configuring
Office 365’s Lync
From the Admin page click Lync's Manage:

This takes you to the Lync Online Control Panel Overview tab
where you can see the Current Settings. Click External Communications to change
the settings and check the status.

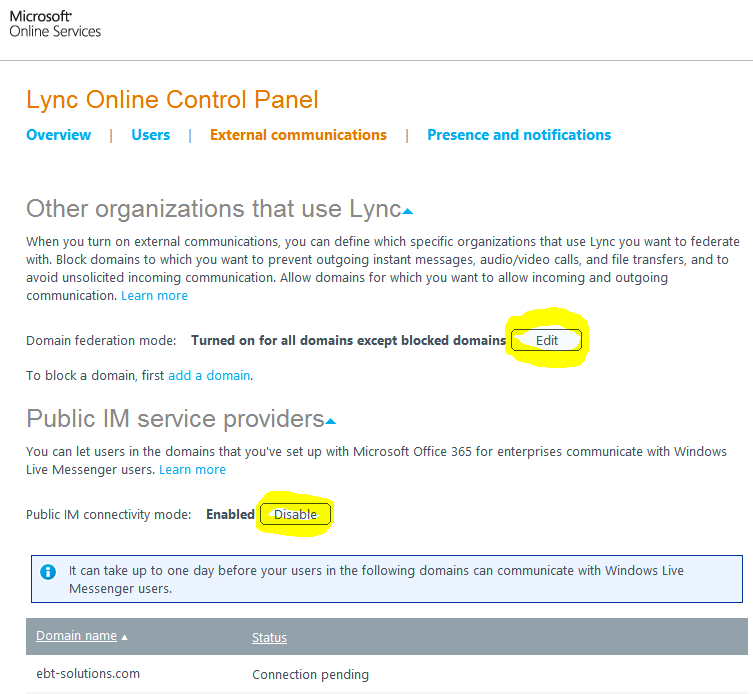
On the External communications tab you need to Turn on Domain
Federation mode (this enables Lync to Lync communication across domains). As
you can see I chose ‘Turn on for all domains except blocked domains’. Also,
here is where you enable Public IM service providers.
Step 2: To
configure external domain name settings This is an expanded list when compared to the list you receive under Admin Overview | Managememnt | Domains | View DNS Settings
- This step is mandatory!
- This step does not include the DNS entries needed for Exchange Online and Mail Delivery!
- These instructions may not be current, please check http://onlinehelp.microsoft.com/en-us/office365-enterprises/hh416761.aspx.
- If you are using your own domain name with Office 365, add the following CNAME and SRV entries to your DNS server:
Type
|
Host name
|
Destination
|
TTL
|
CNAME
|
sip.yourDomainName.com
|
sipdir.online.lync.com
|
1 hour
|
CNAME
|
lyncdiscover.yourDomainName.com
|
webdir.online.lync.com
|
1 hour
|
Type
|
Service
|
Protocol
|
Port
|
Weight
|
Priority
|
TTL
|
Name
|
Target
|
SRV
|
_sip
|
_tls
|
443
|
1
|
100
|
1 hour
|
yourDomainName.com
|
sipdir.online.lync.com
|
- If
your organization supports domain federation or public IM connectivity,
add the following SRV record as well:
Type
|
Service
|
Protocol
|
Port
|
Weight
|
Priority
|
TTL
|
Name
|
Target
|
SRV
|
_sipfederationtls
|
_tcp
|
5061
|
1
|
100
|
1 hour
|
yourDomainName.com
|
sipfed.online.lync.com
|
Step 3: To
configure internal domain name settings
- These instructions may not be current, please check http://onlinehelp.microsoft.com/en-us/office365-enterprises/hh416761.aspx.
- If your organization’s Internet proxies or firewalls are configured to block external SRV queries, add the following CNAME and SRV entries to your internal DNS server:
Type
|
Host name
|
Destination
|
TTL
|
CNAME
|
sip.yourDomainName.com
|
sipdir.online.lync.com
|
1 hour
|
CNAME
|
lyncdiscoverinternal.yourDomainName.com
|
webdir.online.lync.com
|
1 hour
|
Type
|
Service
|
Protocol
|
Port
|
Weight
|
Priority
|
TTL
|
Name
|
Target
|
SRV
|
_sip
|
_tls
|
443
|
1
|
100
|
1 hour
|
yourDomainName.com
|
sipdir.online.lync.com
|
Step 4: Configure
your firewall or proxy server for Lync Online
- This step is not necessary if your firewall does not block Outbound connections.
- These instructions may not be current, please check http://onlinehelp.microsoft.com/en-us/office365-enterprises/hh416761.aspx.
- Open the following ports in your organization’s external firewalls and reverse proxy servers.
Port
|
Protocol
|
Direction
|
Usage
|
443
|
STUN/TCP
|
Outbound
|
Audio, video, and application sharing sessions
|
443
|
PSOM/TLS
|
Outbound
|
Data sharing sessions
|
3478
|
STUN/UDP
|
Outbound
|
Audio and video sessions
|
5223
|
TCP
|
Outbound
|
Lync Mobile push notifications
|
50000-59999
|
RTP/UDP
|
Outbound
|
Audio and video sessions
|
Note: Individual computers are automatically configured
for Lync Online network traffic when Lync is installed.
|
- Create
the following rules to apply to all users on your organization’s network.
·
Allow outgoing connections to *.microsoftonline.com
·
Allow outgoing connections to *.outlook.com
·
Allow outgoing connections to *.lync.com
·
Add a firewall entry for the Microsoft Online
Services Sign-in Assistant, msoidsvc.exe.
·
Set the HTTP/SSL time out value to 8 (eight)
hours.
Step 5: Test
- See http://support.microsoft.com/kb/2566790
- Open a Command Prompt (Admin mode)
- nslookup
- set type=all
- _sip._tls.yourDomainName.com .
- _sipfederationtls._tcp.yourDomainName.com
- sip.yourDomainName.com .
- lyncdiscover.yourDomainName.com .
- Each of the queries should result with an internet address. If not, please see the KB article.
Wednesday, May 2, 2012
Windows Server 2012 (aka 8) Hands On Labs
From the Blog of the "Regular IT Guy" Rick Claus, a Technology Evangelist from Microsoft. It is time to learn about the next generation servers that are nearly upon us. Windows Server 8 Hands On Labs
Saturday, March 10, 2012
Windows 8 Start Button
So, in Window 8 Consumer Preview the Start Button/Pearl is
hidden and here you thought it was removed! Just move the mouse to the lower
left corner of the display to reveal the Start Button. It looks like:


How to create a Windows 8 “Windows to Go” Bootable USB 3 Drive
Here is what you need to create the mobile “Windows to Go”
USB Drive that boots Windows 8 Consumer Preview:
- A PC running Windows 8 Consumer Preview (32 or 64 bit)
- Windows 8 Consumer Preview ISO image 32-bit
- Windows Assessment and Deployment Kit (ADK) for Windows® 8 Consumer Preview
- A USB 3.0 disk at least 32GB or larger - Don’t worry you don’t need a USB 3.0 port on the computer where you will use “Windows to Go”.
- Windows 8 Consumer Preview ISO image 32-bit
- Windows Assessment and Deployment Kit (ADK) for Windows® 8 Consumer Preview
- A USB 3.0 disk at least 32GB or larger - Don’t worry you don’t need a USB 3.0 port on the computer where you will use “Windows to Go”.
Install the Deployment Tools feature when running the
Windows ADK installation onto PC running Windows 8 Consumer Preview.

Prepare the USB 3.0 disk using DiskPart:
- Open a Command Prompt (Admin)- Run DiskPart from the Command Prompt
- Run List Disk
- Select the USB disk, run Select Disk X (where X is the USB Drive #)
- Wipe the USB disk clean, run Clean
- Create a partition on the USB disk, run Create Partition Primary
- Format the partition, run Format FS=NTFS Quick
- Make the partition active, run Active
- Exit DiskPart, run Exit

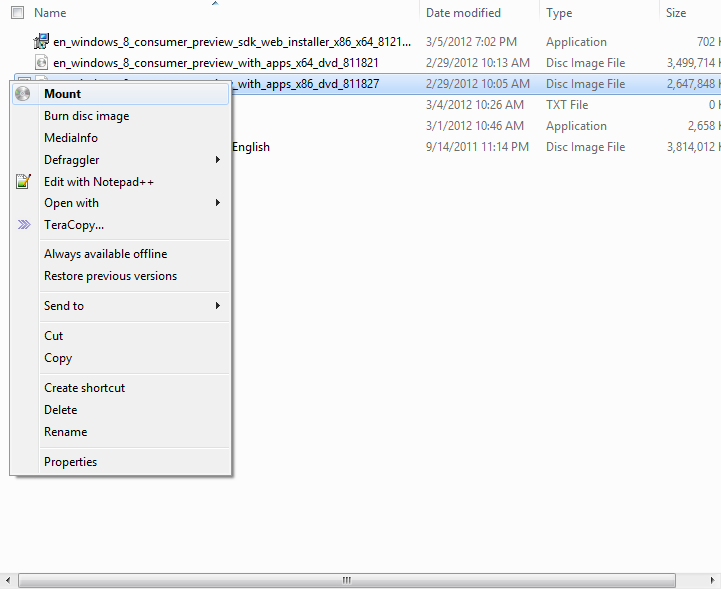
Right-click the ISO and select Mount to mount the
Windows 8 ISO.
I’m running 64-bit so I run CD C:\Program Files (x86)\Windows
Kits\8.0\Assessment and Deployment Kit\Deployment Tools\amd64\DISM to change
the command prompt to the directory that contains the AIK Tools.
To install the files from the wim, run imagex.exe /apply X:\sources\install.wim
1 Y:\ (Where X is the mounted ISO image and Y is the USB disk drive
letters.
To make the USB disk bootable, run bcdboot.exe X:\windows /s X: /f
ALL where the two Xs are the drive letter for the USB disk.

You are finished; you can now use this USB disk to boot into
Windows 8 from any capable computer. This is a fairly locked down version of
Windows 8, so some features won’t be available.
Windows 8 Shortcut Keys
Here are some really helpful key combinations if you are
using Windows 8 Consumer Preview.
Key
Combinations
|
Description
|
Where
|
Windows
|
Toggles
between the Desktop & Start or between Start & the foremost Metro
app.
|
Both
|
Windows .
or Shift .
|
Move the
split to the right or left.
|
Desktop
|
Windows +
or -
|
Magnifier
|
Both
|
Windows
Arrows
|
Aero Snap
|
Desktop
|
Windows
Enter
|
Narrator
|
Both
|
Windows
Pause
|
System
Information
|
Desktop
|
Windows
PgDn or PgUp
|
Move tiles
(Metro) or taskbar (Desktop) to the right or the left.
|
Both
|
Windows
PrintScreen
|
Takes
Screenshot and saves as PNG in Pictures Library
|
Desktop
|
Windows
Spacebar
|
Switch the
input language and keyboard layout
|
Both
|
Windows
Tab
|
Toggles
between other open apps and Start
|
Both
|
Windows #
|
Launches
the nth shortcut on the Desktop taskbar. Windows + 1 will launch the first
application in the list (from left to right). From Start the screen first
switches to the Desktop.
|
Desktop
|
Windows B
|
Select the
tray notification area. From Start the screen first switches to the Desktop.
|
Desktop
|
Windows C
|
Charms and
Time, Date & Notifications.
|
Both
|
Windows D
|
Toggles
Show Desktop. From Start the screen first switches to the Desktop.
|
Desktop
|
Windows E
|
Windows
Explorer with Computer view displayed. From Start the screen first switches
to the Desktop.
|
Desktop
|
Windows F
|
Search
Files.
|
Both
|
Windows G
|
Cycles
between Gadgets on the Desktop
|
Desktop
|
Windows H
|
Share.
|
Both
|
Windows I
|
Settings
for the Start or Desktop screens and provides access to Networks, Volume,
Screen Brightness, Notifications, Power and Language.
|
Both
|
Windows K
|
Displays
Connect for Devices.
|
Both
|
Windows L
|
Lock PC.
|
Both
|
Windows M
|
Minimizes
all open windows and takes you to the Desktop.
|
Desktop
|
Windows O
|
Toggles
the orientation on slate and tablet PCs.
|
Both
|
Windows P
|
Project or
Second screen controls.
|
Both
|
Windows Q
|
Search
within Apps.
|
Both
|
Windows R
|
Run. From
Start the screen first switches to the Desktop.
|
Desktop
|
Windows T
|
Shows
thumbnail preview of the applications on the Taskbar. From Start the screen
first switches to the Desktop.
|
Desktop
|
Windows U
|
Ease of
Access Center. From Start the screen first switches to the Desktop.
|
Desktop
|
Windows W
|
Search
within Settings.
|
Both
|
Windows X
|
Windows
Mobility Center. From Start the screen first switches to the Desktop.
|
Desktop
|
Windows Z
|
App Bar in
Start or a Metro-style app.
|
Start
|
Ctrl Shift
Esc
|
Task
Manager
|
Desktop
|
Ctrl
Windows F
|
Find
Computers
|
Desktop
|
Shift
Right-Click on a file
|
Adds Copy
As Path to Right-Click Menu
|
Desktop
|
Shift
Right-Click on a folder
|
Adds
Command Prompt to Right-Click Menu
|
Desktop
|
Shift
Right-Click on a grouped Taskbar App
|
Opens
Right-Click Menu for Group
|
Desktop
|
Shift
Right-Click on a Taskbar App
|
Opens
Advanced Right-Click Menu for App
|
Desktop
|
Thursday, March 3, 2011
Video - Upgrading through every version of windows
This is a great video for all of the PC techies. Enjoy!
Subscribe to:
Posts (Atom)